Processing of CSV header and footer rows
In CSV or Flat File text files there are often header and/or footer rows included that contain additional information and require processing during the import/export process. With this example we wish to demonstrate to you how CSV header and footer rows are processed using FlowHeater Parameters.
If header and/or footer rows already exist in CSV text files, they generally have a completely different structure to the individual CSV data rows. That is why these rows are processed using Parameters in FlowHeater. For this each header and footer row is processed using separate Parameters.
What we want to achieve
In this example, on the READ side we have a CSV text file with two header rows that contain the date and time respectively of when the report was captured as well as a footer row that contains the relevant inventory status date.
As output on the WRITE side, we want to generate a CSV text file that has a header row with the actual date of the inventory status (equivalent to the footer on the READ side) and a further header row with calculated values that include the count of data rows in the CSV file, the total number of product units and the total value of the inventory. In addition, the date and time values from both the READ header rows are to be output as a single footer row.
How to do this
First create a new Definition with a TextFile Adapter on each of the READ and WRITE sides.
Since header and footer rows are processed with FlowHeater Parameters, you next use the menu option "Edit->Parameter" to define a FlowHeater Parameter. Create here a total of five Parameters (placeholders).
READ: Date of creation
READ: Time of creation
READ: Date of inventory status
WRITE: Creation date
WRITE: Inventory status further info
Note: The names chosen here are arbitrary and serve solely to discriminate between the individual values we subsequently refer to.
Now open the Configurator popup on the READ side and select the "csv-headers-footers.txt" example CSV file. In the preview pane you will see the CSV file data, complete with header and footer rows.
Now switch to the "Header/footer rows tab" and enter for the header rows the "READ: Date of creation" and "READ: Time of creation" Parameters and for the footer row the "READ: Date of inventory status" Parameter.
Next switch to the "General tab" and check the "The first row contains column headings" option, accept the CSV field names obtained from the current file and close the Configurator popup for the READ side by clicking the OK button.
Now open the Configurator popup for the WRITE side and enter a file name to write to, "Output.csv" for example, and check the "The first row contains column headings" option. Then switch to the "Fields / Data types tab" and load the CSV file field names into the READ Adapter by clicking the "Adopt the READ fields" button. Now we have to assign the Parameters for the header and footer rows to output.
For the header rows these are "READ: Date of inventory status" and "WRITE: Inventory status further info" as well as for the footer row "WRITE: Creation date". Note that the header row "READ: Date of inventory status" is used without any changes directly from the READ side. Close the popup by clicking the OK button.
Filling out the Parameters
Now we must ensure the Parameters defined are filled out with the necessary content. For clarity we will use two additional layers to do this. Select the option “Edit -> Configure layers” from the Designer menu and create two further layers. Assign these layers the names "Header rows" and "Footer rows" then click OK. First switch to the "Footer rows" layer.
Footer rows layer
Here we must fill out the "WRITE: Creation date" Parameter. This row consists of the string constant "Creation date:" and the actual date and time from both of the header rows together.
Drag a Parameter Heater onto the Designer window. With a double click open the Heater properties, select the "Get" function and for the Parameter choose "READ: Date of creation" whereby you fetch the contents of the first header row into the process.
From the content
Creation date : 01.08.2012
We must now extract the date itself. To do this we use a String Split Heater and divide the content on the semicolon character. From this we request only the second part as output and thus extract the date alone.
For the time we must read it out a different way, because for the String Split Heater the colons also occur within the time itself.
Drag another Parameter Heater onto the Designer window, open the properties and select the "Get" function once more. This time select for the Parameter the "READ: Time of creation" and so fetch the content of the second header row into the process.
From the content
Creation time : 12:03:55
we need to extract just the time part. To achieve this we use the SubString Heater, by requesting from the 17th character the next 8 characters, i.e. the time only.
We next merge both of the values for date and time together using a String Append Heater. Define for the separator character a space and enter as prefix a static string of "Date of creation:". As a result we have generated a value with the following content.
Date of creation:01.08.2012 12:03:55
So that this value gets assigned to the Parameter "WRITE: Creation date" we need a further Parameter Heater. This time we select the "Set" function in the Heater properties and choose the for the Parameter to set "WRITE: Creation date".
Header rows layer
On this layer the calculations are carried out in order to compose a string as follows
Products:3 – Total units in stock:350 – Total cost value:€6,774.50
and in order to assign this string to the Parameter "WRITE: Inventory status further info".
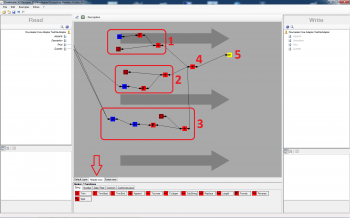
The screenshot to the left is labeled with five numbers (1-5) indicating each of the steps in generating this string.
- Here the processed CSV rows are counted using an AutoID Heater. This value is transformed by formatting it as a (number) string without decimal fraction (INTEGER data type) using a Format Heater. The resulting string is then prefixed with the static string "Products:" in an X-Value Heater and merged together with a String Append Heater to a string with the content "Products:3" as a result.
- At this point a total for the CSV Quantity column is calculated. Note that in the Addition Heater the "Effects on" option "Complete process" must also be selected. The formatting and compilation of the resulting string "Total units in stock:350" follows the same method as described for point 1) above.
- Similar to the procedure described in point 2) above. The only difference is the prior calculation where the CSV columns Cost price x Quantity are multiplied together. As a result we obtain the string: "Total cost value:$6.774,50"
- The strings generated by points 1) to 3) above are concatenated together using a String Append Heater into a single string. As the separator character a hyphen is entered in the Heater properties.
- The resultant string from point 4) is assigned here via a Parameter Heater that sets the Parameter "WRITE: Inventory status further info".
Default layer
Now return to the Default Layer for the Designer and connect all the CSV fields/columns on the READ side identically to the fields/columns on the WRITE side. This can be quickly done using the menu option "Edit -> Automatically connect fields". This function automatically connects the fields/columns to one another with identical names.
That’s all
You can now run the Definition and take a look at the result


