Exporting a flat file (report) from MS SQL Server
This example shows how text is exported as a flat file (report) from an MS SQL Server database by using a combination of the FlowHeater SqlServer Adapter and the TextFile Adapter.
Note: An import of data from a CSV or flat file follows the same principles, but where the Adapters on the READ and WRITE sides are exchanged.
Please first run the CSV import example for MS SQL Server. In that example we described how a table called "import" is generated from a CSV text file. In this example we will export the same table in SQL Server to a text file (flat file) formatted with fixed column widths.
The complete Definition described here can be found in the file export-sql-server.fhd in the directory Examples\EN\SqlServerAdapter. All examples are included in the downloaded ZIP archive of FlowHeater. This example can be used with SQL Server versions 7.0 up to Sql Server 2016 and Express Edition´s.
Choose Flat File export adapter
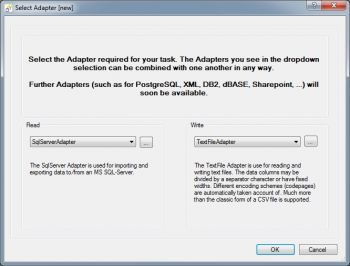 choose flat file export adapterLet’s get started. Open the FlowHeater Designer and click on the menu option "New" to create a new Definition file. In the resulting popup, select SqlServer Adapter for the READ side and TextFile Adapter for the WRITE side.
MS SQL Server connection properties
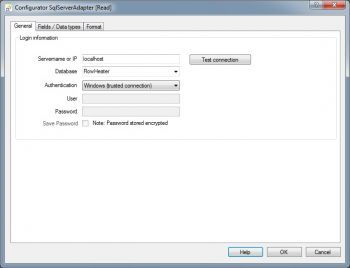 MS SQL Server connection propertiesConfirm with OK to close the popup and then open the Configurator for the READ Adapter and enter the server connection parameters for your SQL Server installation, e.g. "localhost". It may be necessary to append an instance name here too, depending on your SQL Server installation. Once you have entered the server name the databases dropdown will be filled out, showing the databases available on the specified server. Choose from these the "FlowHeater" database we created in the earlier example.
Note : If you want to access an SQL Server instance, you can do this with the following syntax in the servername field.
Servername\Instance
If your SQL Server or Instance is only accessible via a different port to the standard port 1433, you need to specify this after a comma at the end of the servername field.
e.g. Servername\Instance,Port
SQL Server fields and data types
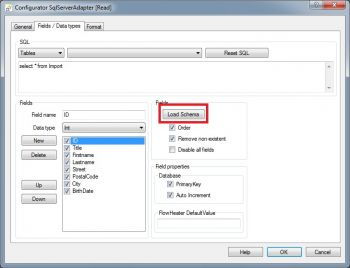 SQL Server fields and data typesSwitch to the "Fields / Data types" tab and select from the dropdown to the right of "Tables" option here the "Import" table we previously wrote to. In the text box beneath the SQL command select * from import will automatically appear.
Note: The command entered in this box can be used to establish more complex SQL statements, such as joins and queries/views as well as procedures.
Subsequently click on the "Load Schema" button (marked in red). This instructs FlowHeater to obtain information about field names and data types from the SQL Server database. Now close the popup by confirming OK.
Now open the context menu of the WRITE Adapter (right mouse click on the entry FlowHeater.Core.Adapter.TextFileAdapter) and chose the menu option "Acquire READ fields"; the field names on the READ side will be automatically replicated on the WRITE side.
Autoconnect fields
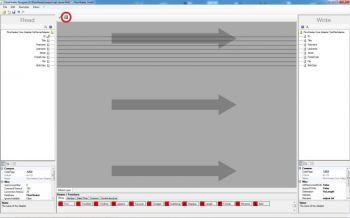 autoconnect fieldsNow click on the Designer command "Automatically connect fields" (circled in red) and confirm the popup that results with OK. Your screnn should now look similar to the screenshot on the right.
Flat File export properties
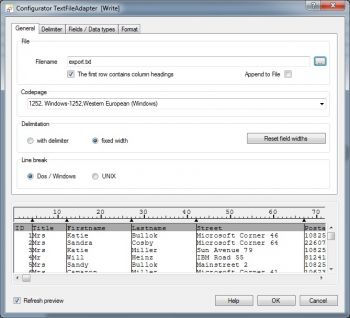 Flat File export propertiesNow open the Configurator for the TextFile Adapter and enter the filename "export.txt". In addition, check the checkbox "First row contains field names" and under the "Delimitation" the radio option "Fixed length". Upon selecting the "Fixed length" option, the FlowHeater TextFile Adapter initially formats a default fixed length of 10 characters for all fields. The popup should now appear as shown on the right.
Flat File fields and data types
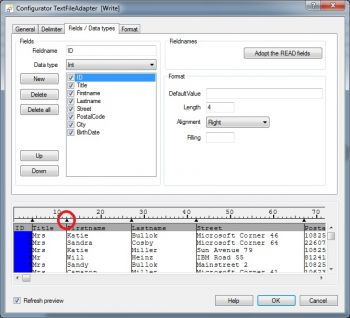 Flat File fields and data typesNow switch to the "Fields / Data types" tab in order to fine tune the field formatting. Click to mark the individual fields in turn and set the fixed column width for each by either entering the field length numerically or by dragging the black triangular tab stop marker (circled in red) to the desired field length/column width. In addition, select from the properties of the first field that we want it to be right justified.
| Fieldname | Width | |
| ID | 4 | |
| Title | 8 | |
| Firstname | 15 | |
| Lastname | 15 | |
| Street | 25 | |
| PostalCode | 6 | |
| City | 15 | |
| BirthDate | 20 |
Execute the definition
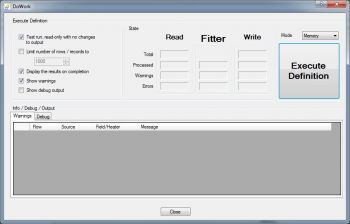 Execute the definitionStart the Test and Execute popup by pressing the F5 button (see below) and run the Definition in test mode.
Flat File Export results
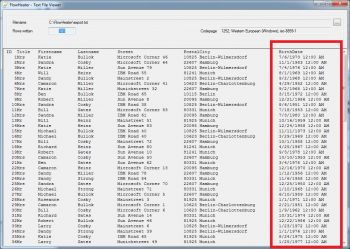 Flat File Export resultsThe integrated text file viewer of the TextFile Adapter will open with the following output. You will notice that the "BirthDate" field (marked in red) is formatted as a date followed by hours and minutes. This would not have been obvious had you selected a column width of 10 or less. We can now adjust the format used in the Configurator of the TextFile Adapter by changing the data type for the BirthDate field from DateTime to simply Date.
Run the Definition again and take a look at what now results.
Microsoft®, Windows®, SQL Server® are registered trademarks of Microsoft Corporation
