Hello World 3, generating test data with fixed column widths (flat file)
Now we get more ambitious. First we will use the method already explained for writing a CSV format text file, but will convert it to a flat file (a text file with fixed string lengths, equivalent to fixed column widths) and also insert an incremental number on each line.
Secondly, we will get the TestData Adapter to work a bit harder and select the words "Hello" and "World" randomly from a list. OK, let’s get started.
Dynamic Test Data
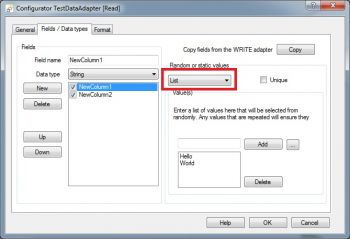
First, open the Definition you saved before as HelloWorld2.fhd and save this again using the "File->Save as" option as a new filename called "HelloWorld3.fhd". Next open the Configurator window for the TestData Adapter on the READ side and select the tab "Fields / Data types". Click on it to mark the field "NewColumn1" and amend the settings for the method of generation from "None" to "List" (marked in red). Add separately two entries to the list consisting of the words "Hello" and "World" and then repeat this procedure with the "NewColumn2" field. Now close the popup by using the "OK" button.
Add Consecutive Number
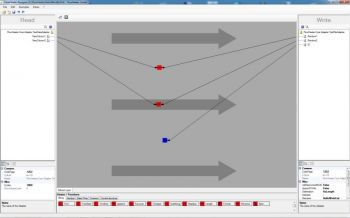
Rename the fields on the WRITE Adapter from "Field for Hello" to "Random1" and "Field for World" to "Random2". Select the option to insert a new field in the context menu (right mouse click) on the WRITE Adapter and rename this new field to "ID". Amend the Heater selection offered to a blue list of functions by choosing the Number tab (marked in red) there and drag and drop the AutoID Heater onto the design area. Finally, join the new Heater with the new ID field with a Pipe. Your screen should now appear similar to the screenshot on the right.
Double clicking on the AutoID Heater will open a configuration popup window. The initial value, increment and decimal places can be configured here. The default values are 1 for initial value and increment, with 0 for decimal places. For the purposes of demonstration adjust the decimal places to 2 and enter a value of 1.23 for the increment.
Now when you execute the Definition once more, this time the resulting output will appear approximately as follows:
world;WORLD;1.00
hello;HELLO;2.23
...
hello;WORLD;999.76
world;HELLO;1,000.99
world;HELLO;1,002.22
...
Standard Number Formatting
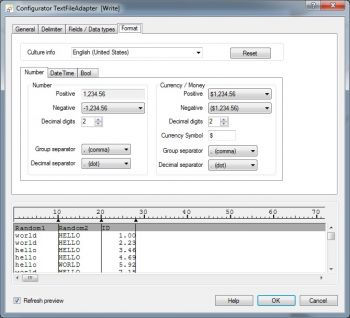
Just as we expected we see a varying assortment of the words "Hello" and "World", but why does FlowHeater format the ID this way? To investigate the reason, open the Configurator on the WRITE Adapter and switch to the Format tab.
Here is the answer to the mystery: Unless otherwise configured, numbers are always formatted according to the settings of the WRITE Adapter. Experiment with the settings here and you will notice the example output at the bottom will update with new random values. Once you have recovered from your surprise, close the popup using the "Cancel" button so that any experimental changes you made are not retained.
Next mark the ID field and use the properties window to amend the "Data type" property from STRING to INT (short for integer, or whole number). Now when you execute the Definition again, the following output should appear.
hello;WORLD;1
world;HELLO;2
...
world;HELLO;999
world;WORLD;1,000
hello;WORLD;1,002
...
Now we have eliminated the decimal fractions, but numbers above 1000 are still formatted with a thousand separator (for a US locale, a comma). We could change the format of numbers so they always appear without a thousand separator or simply amend the Format property of the ID field from "N" to "0". As an alternative we could resort to using the Format Heater. You will also find an example of numeric formatting here.
Flat File Output
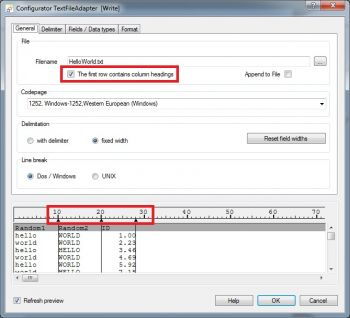
There is one more thing we must do. Actually, we said wanted to generate a text file with fixed column widths (a flat file). Open the Configurator again on the WRITE side’s TextFile Adapter and choose from the "Delimitation" radio options "fixed widths". While we are here, since we also want the first row to contain field names, check the checkbox beneath the filename to enable that option.
Now drag the tab stops with the mouse in the lower part of the popup (circled in red) so that the fields are expanded and look approximately the way they do in the screenshot below.
Tip: To adjust the field widths, you simply drag the small triangular stops with the mouse horizontally.
Now execute the Definition again and take a look at the output. It is amazing how easy something like this can be, isn’t it?
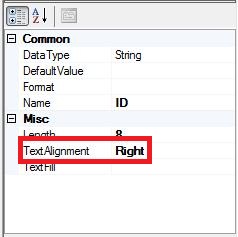
To round off this example, some instructions on how to define a right-justified fixed length field: First mark the ID field in the WRITE Adapter (on the right of the Designer window) and alter the "TextAlignment" property from "Left" to "Right" (circled here in red). Note: This alternative method demonstrates some FlowHeater flexibility; it could equally well be achieved using the Configurator on the TextFile Adapter, under the "Fields / Data types" tab.
Execute Definition
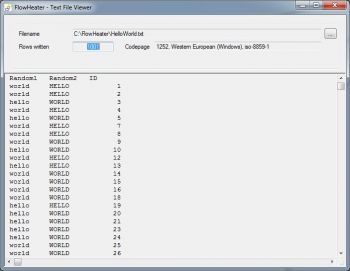
Here is the final result of the test data output with right-justified formatting of the ID field.
