OleDB data source Adapter
The OleDB data source Adapter is used to import (insert), export (select) and amend (update) tables from any chosen OleDB data source. As well being attached to the READ (export) side, the Adapter can also be used on the WRITE (import) side. The only prerequisite is an installed OleDB driver for your data source.
Caution: 32-bit or 64-bit variant? To comply with the type of OleDB driver (32-bit / 64-bit) installed on your system you must use the corresponding FlowHeater variant to connect to an OleDB data source. The 64-bit FlowHeater variant cannot be used with 32-bit OleDB drivers and vice versa. If you encounter an error message stating that OleDB is not available or non-installed, simply try again using the alternative variant of FlowHeater (32-bit / 64-bit). Both FlowHeater variants can be installed in parallel on a computer.
General tab
Connection and authentication
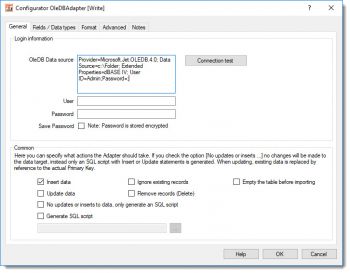
 OleDB Adapter - database propertiesOleDB Data Source: You specify the OleDB connection string here, which is required to enable access to the desired data source. For example, with the connection string:
Provider=Microsoft.Jet.OLEDB.4.0; Data Source=c:\Folder; Extended Properties=dBASE IV; User ID=Admin;Password=;
enables you to access a dBASE (dbf) IV database file in directory C:\Folder.The links below provide detailed examples of connection strings for a variety of data sources:
https://www.connectionstrings.com/
User/Password: In case your OleDB data source requires a User and/or Password strings for a potential authentication, you can enter these here. The password is stored in an encrypted form. In the connection string you need then only use the templates $USER and $PASSWORD.
e.g.
...User ID=$USER; Password=$PASSWORD
The OleDB Adapter then substitutes these templates with the actual values entered here.
Important: The password entered is only permanently stored if you check the "Save Password" option. Should a password be saved, it is stored in an encrypted form in the Definition data.
Common
Insert data: When this option is checked, SQL Insert statements are generated.
Ignore existing records: During an import and when this option is checked, records that already exist in the table are ignored.
Empty the table before importing: When this is checked you tell the OleDB Adapter to empty the contents of the table prior to running the import, effectively deleting all existing rows.
Update data: When this option is checked, SQL Update statements are generated. Note: If both the Insert and Update options are checked, the OleDB Adapter checks whether an SQL Update or Insert should be generated in each instance, by reference to the PrimaryKey. Tip: If you are certain there is only data to insert then avoid checking the Update option, as this will make the process significantly faster.
Remove records (Delete): This will attempt to delete existing records by reference to the fields of the index “Primary Key”. Note: This option cannot be used together with the INSERT or UPDATE options.
No updates or inserts to data, only generate an SQL script: When this option is checked, it signals the OleDB Adapter to make no inline changes to the database, but instead to store an SQL script with Insert and/or Update statements. This is useful for testing during development and for subsequent application to the database. If this option is checked you should also check the option below and enter the filename that the SQL statements are to be stored in.
Generate SQL script: This option instructs the OleDB Adapter to store the change statements (Insert, Update) as an SQL script file with the specified name and path.
Fields / Data types tab
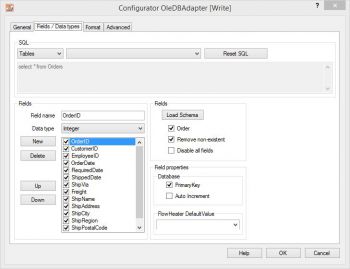
 OleDB Adapter - fields and data typesSQL: data available varies according to the side of the Adapter in use:
On the READ side: here you can choose from Tables and Views.
On the WRITE side: only Tables are available.
On the READ side you also have the possibility to enter complex SQL statements in the text field. Table joins must be defined by hand. In the second combo box the tables and views are listed that are available in the specified OleDB database.
Fields: When you click the Load Schema button, information is retrieved from the database schema (field names, field sizes, data types, primary key, etc.) for the SQL statement above. The information about the fields is then loaded into the field list to the left of this button.
Note: The fields in the field list can be ordered in any sequence required. Fields that are not required can either be temporarily disabled here (tick removed) or simply deleted.
Field properties: How the properties of Primary Key and Auto Increment for the currently highlighted field are to be interpreted are adjusted. This information is only required on the WRITE side. No changes are needed here generally, since the correct information is usually obtained directly from the schema.
A PrimaryKey field is used in an Update to identify record that possibly exists.
Auto Increment fields are neither assigned nor amended in Insert/Update statements.
Warning: If you make changes here it can result in more than one record being updated with an Update!
Advanced tab
General
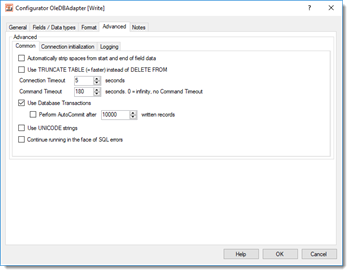
 OleDB Adapter - extented propertiesAutomatically strip spaces from the start and end of content: If you check this option an auto trim of whitespace characters will be carried out on STRING data types. This means that any spaces, tabs and line break characters are automatically removed from the leading and trailing parts of strings.
Use TRUNCATE TABLE (=quicker) instead of DELETE FROM: When the option “Empty the table before importing” under the General tab is checked “TRUNCATE TABLE” instead of “DELETE FROM” (=default) is used to empty the table content.
Connection timeout: Timeout in seconds while waiting for connection to be established. If no connection has been made after this period, then the import/export run is aborted.
Command timeout: Timeout in seconds while waiting for an SQL command to complete. By entering a zero value here, effectively disables the option altogether. In that case SQL commands will never timeout and are awaited endlessly. This option makes sense when you select massive data volumes from a database on the READ side and the OleDB datasource takes a long time to prepare its result.
Use database transactions: This allows you to control how data is imported. According to the default settings OleDB Adapter uses a single “large” transaction to secure the entire import process. When importing extremely large volumes you may have to adapt transactional behavior to your needs using the “Run AutoCommit after writing every X records”.
Use UNICODE strings: When checked this option will force output of a prefix to the initial apostrophe. e.g. N’import value’ instead of ‘import value’.
Continue running in the face of SQL errors: This option allows you to instruct FlowHeater not to abort a run when it encounters an OleDB datasource error. Warning: This option should only be used in exceptional circumstances, because database inconsistencies could result.
Connection initialization
User-defined SQL instructions for initializing the connection: You can place any user-defined SQL commands here, which will be used for initializing the connection after a connection to the OleDB data source has been established.
Adapter settings in the Format tab
Examples

